
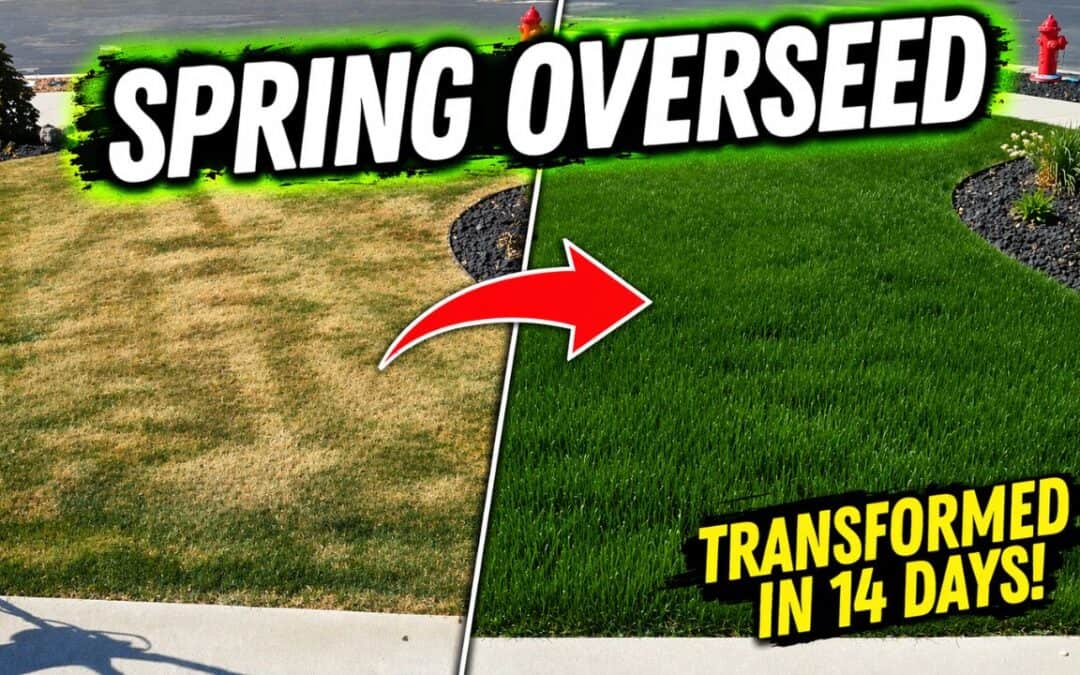
Spring is one of the best times to help your lawn recover from winter and get it ready for the growing season ahead. Cold weather, snow, foot traffic, pets, and leftover damage from the previous year can all leave your yard looking thin, patchy, and worn out.
A spring overseed can help thicken the lawn, fill in bare areas, and improve overall color before summer arrives. Find out exactly how to do a spring overseed on your lawn right here:
Why Do a Spring Overseed?
A spring overseed works well for a few main reasons. First, it helps repair winter damage. If your lawn looks matted down, thin, or patchy after the colder months, overseeding gives it a chance to bounce back.
Second, spring is also a good time to introduce darker or stronger grass cultivars into an existing lawn. In this case, the goal was to improve color while adding perennial ryegrass that offers fast germination along with disease and drought resistance. We picked one of the darkest perennial ryegrasses on the market (NightShift Dark:30) to help turn this lawn dark green as quickly as possible.
Another benefit of overseeding in the spring is that thicker turf helps to reduce weed pressure. Overseeding your lawn gives less space for those nasty weeds like crabgrass, clover, dandelions and spurge to infiltrate your lawn.
When Is the Best Time to Overseed?
The two best times to overseed are spring and fall. In spring, mild air temperatures combined with warming soil create good conditions for seed germination. Before starting, there are a few things to check.

One of the biggest factors is pre-emergent. If pre-emergent has already been applied, spring overseeding should wait until fall because it can prevent the new grass seed from growing. Soil temperature also matters. For a spring overseed, soil temperatures should be consistently in the 50 to 60 degree range.
A simple meat thermometer pushed about two inches into the soil can give you a quick reading. Access to water is also important since the seed will need frequent watering to stay moist during germination.
Tools You’ll Need For Your Spring Overseed
Here are the basic tools you’ll need to complete an overseed on your lawn in spring. Since one of the major goals of an overseed is to darken your lawn, you’ll find one of the darkest perennial ryegrasses on the market in the list below:
- Nightshift Dark:30 Grass Seed – https://thelawnlife.com/products/dark-30-formerly-blackout-2-0-pre-sale?sca_ref=9570198.tnSsFSCU50O&sca_source=YouTube
- Sun Joe Electric Lawn Dethatcher & Scarifier – https://amzn.to/4tdq8st
- Contractor-Grade Trash Bags – https://amzn.to/48gPeiC
- Leaf Rake – https://amzn.to/4npip7s
- Garden Gloves – https://amzn.to/4leHEbn
- Scotts Whirl Hand-Spreader – https://amzn.to/46DCpON
- Peat Moss Spreader – https://amzn.to/3VcKUJE
- Peat Moss – https://amzn.to/4gwtPUU
- Starter Fertilizer- https://thelawnlife.com/products/dark-matter%E2%84%A2-12-24-8-starter-fertilizer?sca_ref=9570198.tnSsFSCU50O&sca_source=YouTube
Step 1: Scalp the Lawn
The first step in a spring overseed is to scalp the lawn by lowering the mower deck as much as possible, usually around 1 to 1.5 inches.
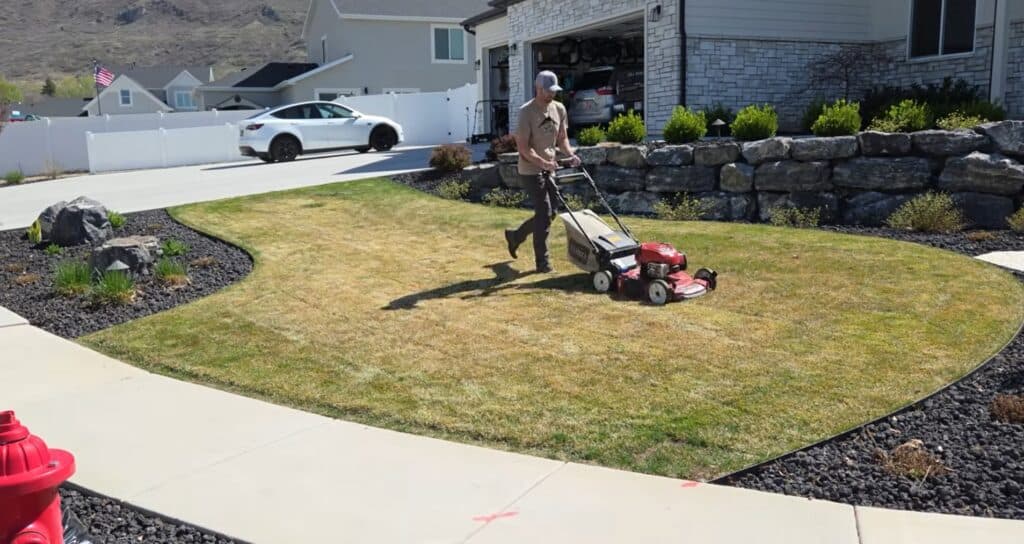
This helps pull up dead material that built up over winter and opens the lawn so the new seed has a better chance to reach the soil. This gets you one step closer to the thatch layer of the lawn, which is adjacent to the soil.
Scalping can make the yard look rough for a little while, but that is part of the process. It clears space for new growth and makes the next steps more effective.
Step 2: Dethatch and Scarify
After scalping the lawn, the next step is to get deeper into the lawn by removing thatch and loosening the soil surface. This helps create small pockets where air, water, and nutrients can move more easily, and it also creates better places for new grass seed to settle and germinate. A Sunjoe dethatcher or scarifier can work well for this step, especially since it can both pull out debris and lightly break up the soil surface at the same time.
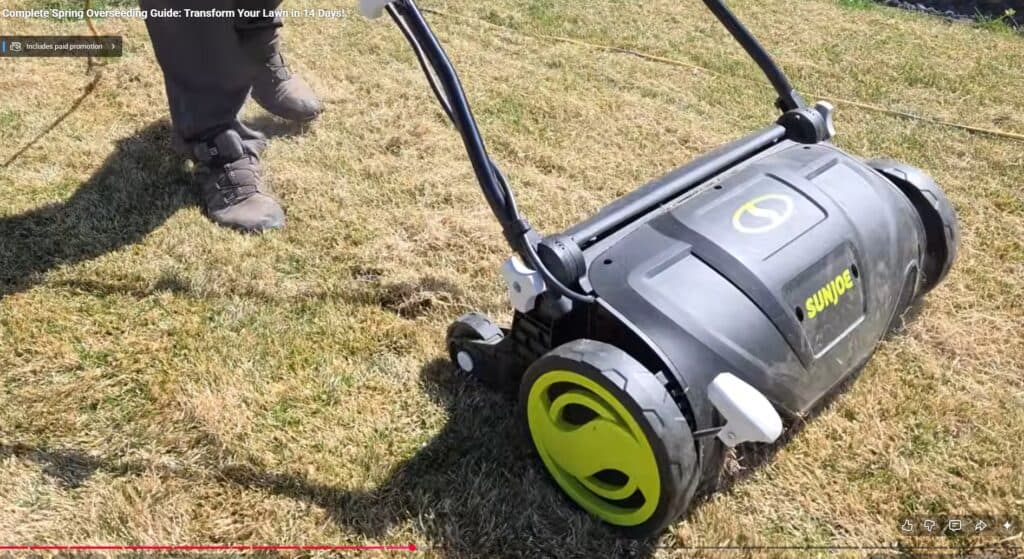
Rather than use the dethatcher attachment, though, go for the scarifier attachment. It has large blades (as opposed to skinny tines) that get deeper into the soil, provide some aeration, and make perfect beds for the new grass seed.
For the best coverage, it helps to make two scarifying passes in different directions. Going one direction on the first pass and then perpendicular on the second can pull up even more thatch and create better seed-to-soil contact across the yard. Once finished, clean up the loose material by raking it into piles or mowing it up with the mower deck raised back to a normal height.
Step 3: Choose the Right Grass Seed
Seed choice matters. Lower-quality seed blends from big box stores may include fillers, coatings, or even small amounts of weed seed.
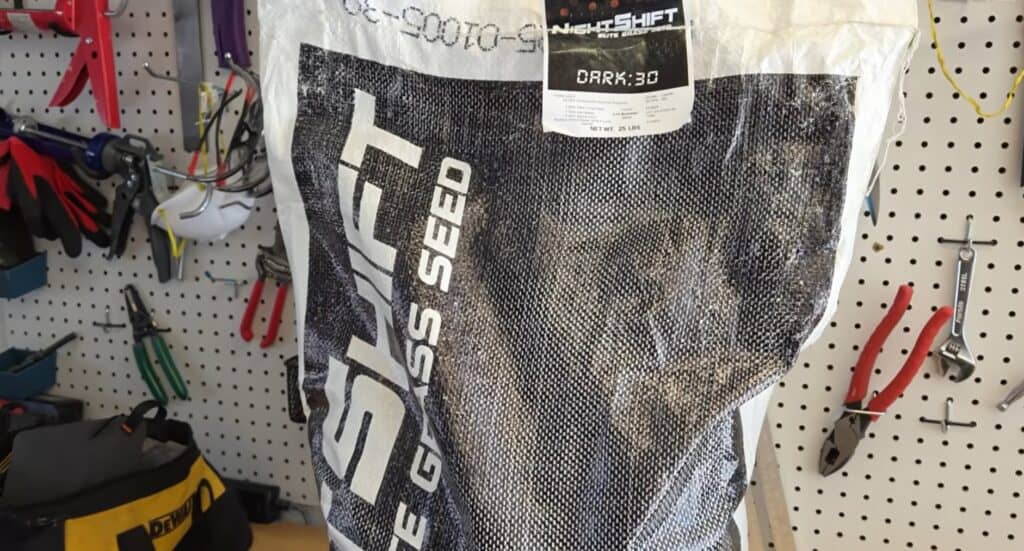
For this overseed, a premium perennial ryegrass blend called Night Shift Dark:30 was used because it offers a darker green color, disease resistance, and very quick germination. Perennial ryegrass can germinate in about 5 to 7 days, while Kentucky bluegrass may take much longer. That fast germination makes perennial rye a strong option when you want quicker results.
In fact, you can get back on the grass in as soon as 14 days!
Step 4: Apply the Seed at the Right Rate For Overseeding
When overseeding, you usually apply less seed than you would for a brand-new lawn. In this case, the recommended overseeding rate for Nightshift Dark:30 was 5 to 7 pounds per 1,000 square feet, compared to 7 to 10 pounds per 1,000 square feet for a full new seeding. Knowing your lawn’s square footage helps you apply the right amount.
A hand spreader can work well for overseeding smaller lawns and can help give even coverage. Start with a perimeter pass, then spread in one direction, followed by a second pass in the opposite direction. For bare areas, add a little extra grass seed by hand so those spots get better coverage.
Step 5: Add Starter Fertilizer
A starter fertilizer can help new grass establish more quickly. In this spring overseeding project, a 12-24-8 starter fertilizer was used at a rate of 3.5 pounds of product per 1,000 square feet.
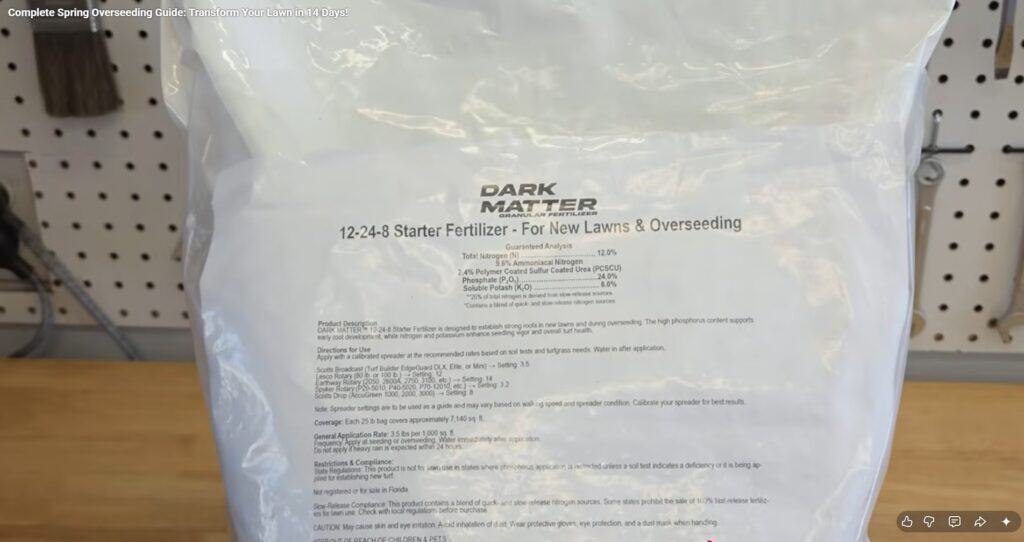
A starter fertilizer gives the new seedlings nutrients that support early root growth and establishment. The other reason to go with a starter fertilizer is it has a more even blend of nitrogen, potassium an phosphorous than an aggressive fertilizer for established lawns.
You don’t want to crowd out your new grass seed with an aggressive nitrogen-based fertilizer before it has a chance to grow!
Step 6: Improve Seed-to-Soil Contact
Good seed-to-soil contact is one of the most important parts of a successful overseed in spring (or fall!). After spreading seed, some of it may sit on top of the grass blades instead of reaching the soil. To improve contact, you can lightly rake the yard, walk over bare spots, or use a roller.
In this case, peat moss was also used as a top dressing and was applied using a peat moss spreader. This allowed us to push the seed down to the soil as well as get that layer of top dressing over the new seeds.
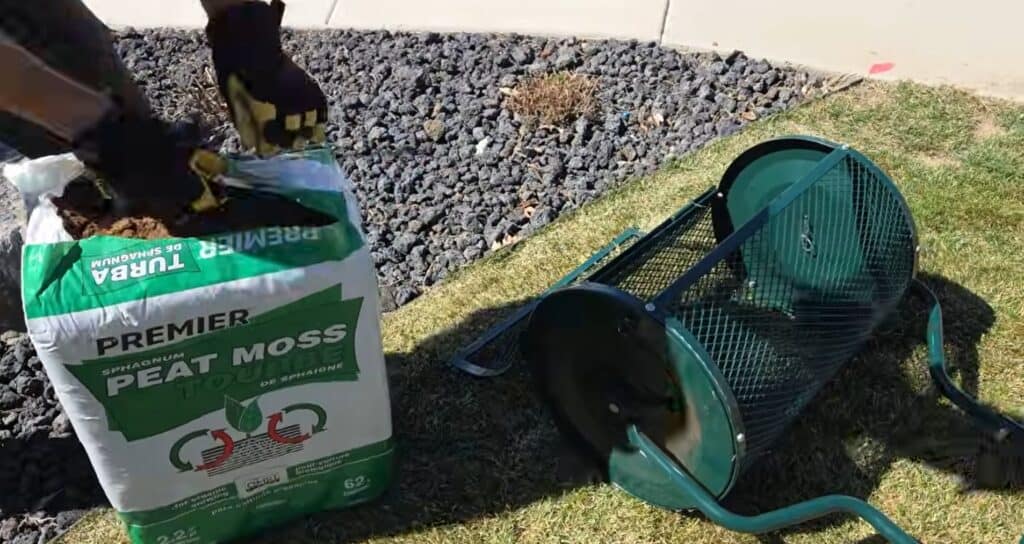
A light layer of peat moss helps hold moisture, protects seed from birds, and gives the seed a better environment for germination. Around a quarter inch is enough, and the new grass can grow right through it.
After spreading peat moss, making one more pass with the spreader or another tool can help press everything down a bit more.
Step 7: Water the Grass Seed Consistently
Once the seed is down, watering becomes the most important part of the spring overseeding process. New grass seed needs to stay consistently moist to germinate.
A good starting point is watering about three times a day for 5 to 10 minutes per cycle, depending on how much water your irrigation system puts out. Morning, midday, and late afternoon watering can work well to keep the seedbed from drying out.
You’ll typically water every day for about 10-14 days (if you get an unexpected spring freeze that delays seed germination, you may need to go a little longer).
What Results Can You Expect From a Spring Overseeding?
In this spring overseed, the first small sprouts started showing up at around the one-week mark.
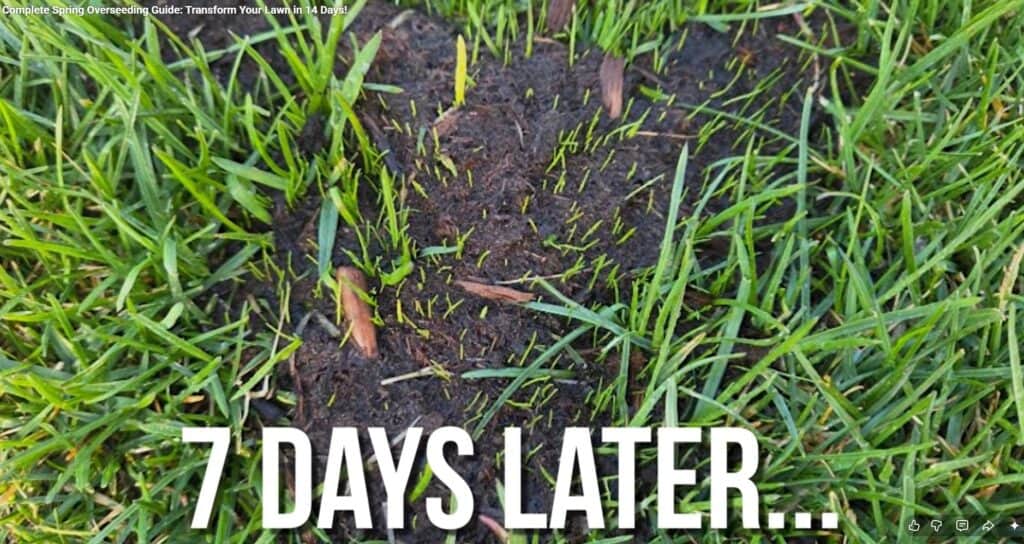
Just over two weeks later, the lawn was noticeably thicker, darker, and fuller, especially in areas that had been thin or bare before. Some spots filled in especially well, like this bare patch we were trying to fill in.

Other areas needed a little touch-up seed after rain likely washed some seed away.
That is normal. If a few bare spots remain, the hard part of the spring overseeding is already done. Add a little more seed, press it into the soil, cover it with peat moss, and hand water those sections for about a week. That usually gives those trouble spots another chance to fill in.
Fix Your Ugly Lawn With A Spring Overseed!
A spring overseed is a simple way to repair lawn damage, thicken thin turf, and improve the dark green color of your grass heading into summer.
The key is getting the timing right, preparing the lawn well, using quality seed, and staying consistent with watering. When those pieces come together, you can see a big improvement in a short amount of time!